How to Install a Whirlpool Refrigerator Water Filter: Every EveryDrop Model — Complete 2025 Guide

🔧 Whirlpool Installation Guide

How to Install a Whirlpool Refrigerator Water Filter: Every EveryDrop Model — Complete 2025 Guide

👤 Rachel T. — Filter Specialist 📅 Updated January 2025 ⏱ 11 min read 🔬 Covers Whirlpool · Maytag · KitchenAid · Kenmore · Amana
RT
Rachel T.
Head of Filter Compatibility — SwapMyFilter
Rachel has documented filter installation and troubleshooting across the entire Whirlpool brand family — Whirlpool, Maytag, KitchenAid, Kenmore (106.xxxxx), Amana, and Jenn-Air — covering every EveryDrop filter number across 400+ refrigerator models. Every model-specific reset method in this guide is independently verified.
6 minInstallation time
No toolsRequired
6 brandsCovered
Filter 1–5All EveryDrop

Whirlpool’s EveryDrop filter platform is the most widely deployed refrigerator filter system in North America — covering Whirlpool, Maytag, KitchenAid, Kenmore, Amana, and Jenn-Air refrigerators under one shared platform. The installation process is the same across all five EveryDrop filter numbers. The critical step that trips up thousands of buyers every month is not the installation itself — it is ordering the wrong filter number, or leaving on the protective cap.

This guide eliminates both problems and gives you the exact reset method for every Whirlpool brand family control panel.

🚨 Step Zero — Confirm Your Exact EveryDrop Filter Number First

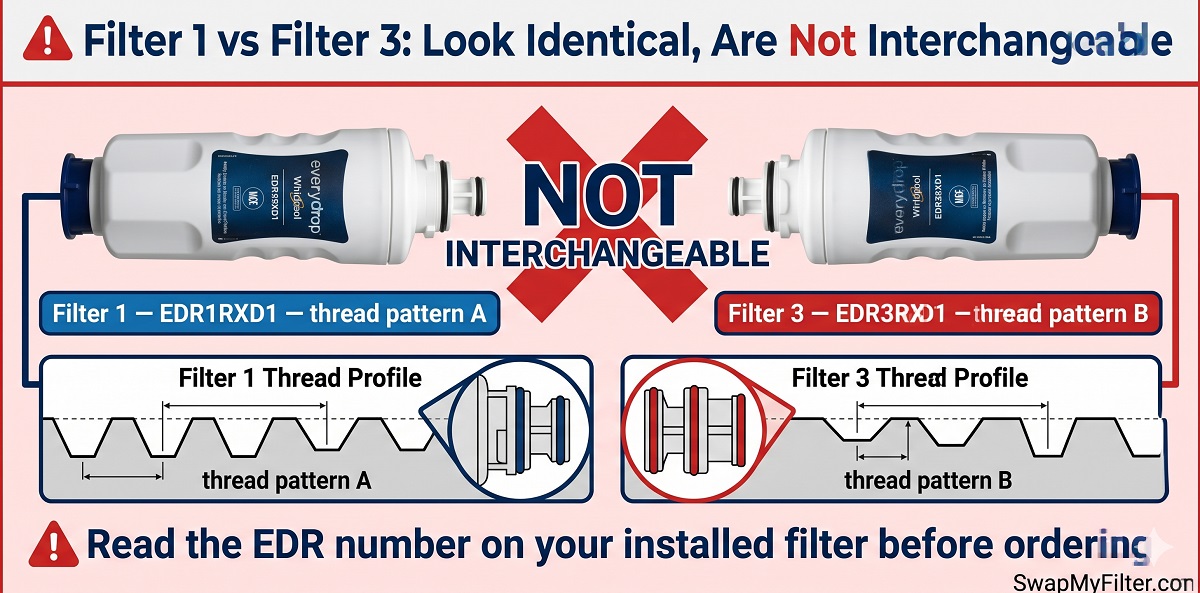
EveryDrop Filter 1 (EDR1RXD1) and Filter 3 (EDR3RXD1) are visually identical but have different thread patterns and are not interchangeable. Installing the wrong filter will result in a partial seat that leaks or blocks water flow. Read the label on your currently installed filter before ordering — it will show the EDR number directly. Never order by refrigerator brand or series name alone. The only safe source of truth is the part number on the installed filter, or our Filter Compatibility Checker.

This Guide Covers All Six Whirlpool Family Brands

WhirlpoolFilter 1, 2, 3, 4, or 5
MaytagFilter 3 or 4 (most)
KitchenAidFilter 3 (most)
Kenmore 106.xxxFilter 1 or 3
AmanaFilter 1, 2, or 5
Jenn-AirFilter 3 (most)

All EveryDrop filters use the same quarter-turn twist-in mechanism regardless of the refrigerator brand or filter number. The installation steps below apply to every brand and every filter number in the EveryDrop lineup.

Whirlpool EveryDrop Filter 1 vs Filter 3 not interchangeable warning

Step-by-Step: How to Install a Whirlpool EveryDrop Water Filter

1

Locate the Filter Housing

Open the fresh food compartment of your Whirlpool family refrigerator. The EveryDrop filter is a cylindrical cartridge in the upper interior of the refrigerator — typically upper right or upper center depending on your model. Look for a circular housing with the installed filter’s end visible.

On Whirlpool and Maytag side-by-side models, the filter location is the same — upper interior of the fresh food section. On older Whirlpool models (pre-2008), a small number have the filter in the lower front grille — if you cannot find it in the upper interior, check the grille at floor level.

Your Whirlpool model number is on a sticker inside the left door frame. The EveryDrop number on your installed filter is the only reliable way to confirm which filter you need. Photograph it now for your records.
2

Turn Off the Ice Maker

Before removing the filter, turn off the ice maker to prevent water from being drawn through the system during the swap. On most Whirlpool and Maytag models: lift the wire shut-off arm to the raised horizontal position inside the ice maker bin in the freezer. On models with an electronic ice maker control: press the ice maker off button on the freezer wall panel or the external control panel.

3

Remove the Old EveryDrop Filter

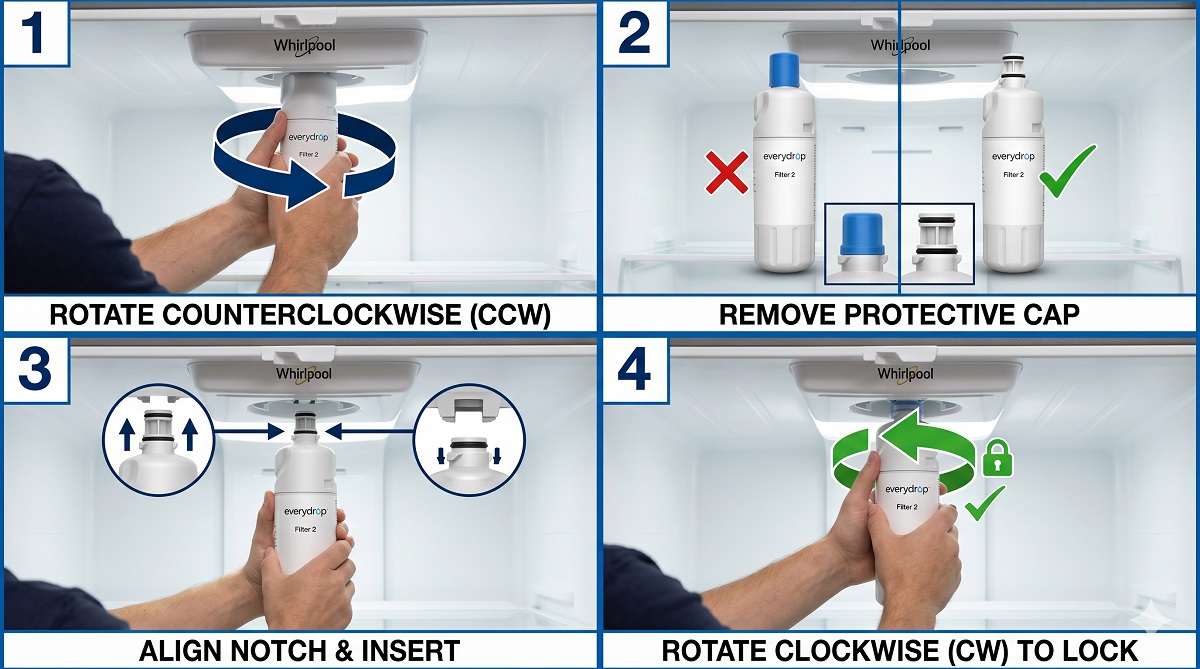
Grip the filter body firmly with one or both hands. Rotate counterclockwise approximately a quarter-turn (about 90 degrees) — you will feel the filter disengage from the housing’s locking mechanism. Once disengaged, pull the filter straight out from the housing. Place a folded towel below the housing before removing — a small amount of water will drip when the filter is pulled free.

Older EveryDrop filters that have been installed for more than 8 months can be significantly tighter than usual. This is normal mineral buildup on the O-ring seat. Apply firm, steady counterclockwise pressure rather than quick jerking. A rubber band wrapped around the filter gives extra grip. Do not use pliers — they can crack the filter body.
4

Remove the Protective Cap — The Most Missed Step

Unbox the new EveryDrop filter. Examine the insertion end — the end that will go into the housing. There is a plastic protective cap covering the O-ring seal. This cap is typically blue or white and may look like a permanent end cap rather than something to remove.

It must be removed completely before installation. Installing the filter with the cap still on prevents the O-ring from sealing against the housing seat — producing an immediate leak or zero water flow. This single step accounts for the majority of all “new filter is leaking” support calls across every major refrigerator brand.

After removing the cap, inspect the O-ring. It should be smooth, uniformly circular, seated evenly in its groove, with no cracks or flat spots. A damaged O-ring on a new filter indicates a manufacturing defect — contact us for a replacement under our Guaranteed Fit Promise before installing.
5

Insert and Lock the New Filter

Look at the filter end and the housing opening — there is a notch or tab that must align before the filter can be inserted. Align the filter so the notch matches the housing guide, then push the filter straight in with firm pressure until fully seated.

Once fully inserted, rotate clockwise approximately a quarter-turn until you reach a firm mechanical stop. There should be zero play or wobble when correctly locked. On most EveryDrop models, the locked filter will sit flush with the housing rim.

A common mistake is stopping the clockwise rotation at the first sign of resistance rather than continuing to the full mechanical stop. The quarter-turn must be completed all the way to the locked position — partial rotation results in a filter that leaks around the O-ring. Apply firm pressure and complete the full rotation.
6

Check the Seal and Restore Ice Maker

After locking the filter, gently attempt to pull it straight out without rotating — a correctly locked filter should not move. Also try to wiggle it side to side. Zero movement indicates a proper seal. Then restore the ice maker to the ON position (lower the wire arm or press the ice maker on button).

7

Flush 2–3 Gallons Through the Dispenser

Activated carbon block filters release harmless fine carbon particles during the first use — these produce grey or cloudy water until cleared. Dispense water continuously for 4–6 minutes into a bucket, discarding all output. Do not drink or use this water. The water will progress from cloudy grey to completely clear as the flush clears the carbon particles.

After flushing, also discard the first full ice maker cycle — ice produced with pre-flush water can retain trace carbon particles. Full flushing guide: How to Flush a New Refrigerator Water Filter.

Flush water is completely safe for non-drinking uses — plants, mopping, outdoor watering. At 2–3 gallons of water you would otherwise discard, the cost of flushing is under $0.01 on a typical municipal water bill.
8

Reset the Filter Indicator Light

Whirlpool family refrigerators use a countdown timer as the filter indicator — it must be manually reset after every filter replacement. Find your model in the reset table below and follow the exact reset sequence.

The reset must be held for the full stated duration. A quick press or a 1-second hold will not register on most Whirlpool family control panels. Hold firmly until you see or hear confirmation — the indicator changing colour, a beep, or the display updating.
LG refrigerator water filter installation step by step photo guide

Filter Indicator Reset Methods — All Whirlpool Family Brands

Brand / Model SeriesReset Method
Whirlpool WRF, WRS, WRB (2016+)
Hold “Filter Reset” button for 3 seconds until indicator turns blue or off
Whirlpool WRF, WRS (2012–2016)
Hold “Light” and “Lock” simultaneously for 3 seconds, OR hold “Filter” for 3 seconds
Maytag MFI, MFT, MFF (2015+)
Hold “Filter Reset” or “Water Filter” for 3 seconds until indicator changes colour
Maytag MFD, MBF (older)
Hold “Filter Reset” for 3 seconds. Some models: hold “Ice Type” + “Water” for 3 seconds
KitchenAid KRFC, KRMF, KRSF
Hold “Water Filter” for 3 seconds until indicator turns from orange/red to blue/green
Kenmore 106.xxxxx (Whirlpool-built)
Hold “Filter” or “Filter Reset” for 3 seconds. Some models: “Start” + “Cancel” together for 3 seconds
Amana AFF, ABB, AFI (2013+)
Hold “Water Filter” or “Filter” button for 3 seconds
Jenn-Air JFC, JFI (2014+)
Hold “Filter Status” or “Filter Reset” for 3 seconds until status changes
Whirlpool with no dedicated Filter Reset button
Hold “Light” + “Ice” together for 3 seconds, or consult your manual for the combination specific to your control panel layout
💡 The Indicator Light Is a Timer — Not a Filter Sensor

Every Whirlpool family refrigerator filter indicator counts 180 days from the last reset. It has no ability to measure water quality, carbon saturation, or actual filter capacity. A green light does not mean your filter is working perfectly. A red light does not mean the filter just failed — it means 180 days have elapsed. For large households reaching 200 gallons before 6 months, the indicator may still show green while the filter is actually spent. Set your own calendar reminder based on your household’s usage rate. For the personalised schedule calculator: How Often Should You Really Change Your Refrigerator Water Filter?

Post-Installation Troubleshooting

💧 Water leaking from the filter area after installation
Most common cause (80% of cases): Protective blue/white cap still on the O-ring end of the new filter. The filter may appear to be seated but cannot seal.
Remove the filter. Confirm the cap is completely removed from the insertion end. Reinstall and rotate clockwise to a definitive mechanical stop. If still leaking after confirming cap is off, confirm you ordered the correct filter number — wrong filter numbers will not seal even when correctly rotated.
🚰 Slow water flow or no water after filter replacement
Cause: Filter not fully locked (valve blocked), filter needs flushing, home water pressure below 20 PSI, or air lock in water line after filter change.
Confirm full clockwise rotation to the locked stop. Run 3 gallons flush water. Check the supply valve behind the fridge is fully open. If flow remains poor after flushing, confirm home water pressure meets Whirlpool’s 20–120 PSI specification using an inexpensive pressure gauge on the supply valve.
🔴 Filter light stays red after pressing reset
Cause: Incorrect reset sequence, insufficient hold duration, or control board temporary glitch.
Use the exact reset method from the table above for your specific model series. Hold for the full 3 seconds — a 1–2 second press will not register. If still not resetting, try the alternative method listed. As a last resort, unplug the refrigerator for 60 seconds to clear the control board, then try the reset sequence again. The physical filter replacement is complete regardless of indicator status.
❄️ Ice maker not making ice after filter change
Cause: Ice maker arm left in OFF position, air in water line after filter change, or ice maker needs time to re-prime.
Confirm the ice maker arm is lowered to the ON position. Run the dispenser for 3–5 minutes to flush air from the water line. Wait 12–24 hours for the ice maker to resume full production — the water line re-priming takes time. If no ice after 24 hours with the arm down, inspect the supply valve behind the fridge and confirm it is fully open.
🥛 Water tastes of chlorine or has an odd taste after new filter
Cause: Filter not yet fully flushed. New carbon filters require 2–3 gallons of flush water before chlorine reduction is fully effective.
Run an additional 2 gallons through the dispenser, discarding the output. Allow 30 minutes for the carbon to fully activate, then test again. If chlorine taste persists after 5+ gallons of flushing, verify your filter carries NSF/ANSI 42 certification for chlorine reduction at info.nsf.org. Full guide: Fridge Water Tastes Like Chlorine.
📋

Not sure which EveryDrop number your fridge needs?

Enter your Whirlpool, Maytag, KitchenAid, or Kenmore model number for an instant guaranteed filter match.

Find My EveryDrop Filter Number →

EveryDrop Filter Quick Reference

EveryDrop FilterPart NumbersPrimary RefrigeratorsCompatible PriceOEM Savings
Filter 1 (EDR1RXD1)W10295370A, Kenmore 46-9930Whirlpool WRF/WRS French Door and Side-by-Side (2013+)$16.95Save $23
Filter 2 (EDR2RXD1)W10413645ASelect Whirlpool and Amana side-by-side$15.95Save $22
Filter 3 (EDR3RXD1)W10295370A, Kenmore 9081Whirlpool, Maytag, KitchenAid, Kenmore 106.xxxxx (most common)$16.95Save $23
Filter 4 (EDR4RXD1)W10515057, UKF8001AXXWhirlpool/Maytag Bottom-Freezer and French Door (select)$16.95Save $23
Filter 5 (EDR5RXD1)W10186668, Kenmore 46-9010Older Whirlpool/Maytag side-by-side (pre-2014)$15.95Save $22

For the complete EveryDrop breakdown: Whirlpool EveryDrop Filters 1–5 Full Comparison. For the most common filter guide: Whirlpool W10295370A / EveryDrop Filter 3 Complete Guide. For the Whirlpool-Maytag compatibility guide: Whirlpool vs Maytag Filter Compatibility.

💡 Warranty Protection When Using Compatible Filters

Under the US Magnuson-Moss Warranty Act, Whirlpool generally cannot void your refrigerator warranty solely for using a certified compatible water filter. Whirlpool’s written warranty documentation acknowledges this standard. For refrigerators in their first 12 months of active warranty, OEM is the conservative choice. After 12 months, NSF-certified compatible is fully appropriate and saves $23 per filter. Full analysis: OEM vs Compatible Refrigerator Water Filters.

Frequently Asked Questions

Where is the water filter on a Whirlpool refrigerator? +
On most Whirlpool French door and side-by-side refrigerators, the EveryDrop water filter is located in the upper interior of the fresh food compartment — typically upper right or upper center depending on the model. Open the refrigerator door (not the freezer) and look up toward the ceiling of the fridge interior for a cylindrical filter housing. On older Whirlpool and Maytag side-by-side models manufactured before 2008, some models have the filter in the lower front grille. If you cannot find it in the upper interior, check the grille at floor level. For the complete location guide for every brand: How to Find Your Filter Model Number.
How do I reset the water filter light on a Whirlpool refrigerator? +
On most current Whirlpool refrigerators (2016+): press and hold the “Filter Reset” button on the control panel for 3 full seconds until the indicator changes from red or orange to blue or green. On older models (2012–2016): hold “Light” and “Lock” simultaneously for 3 seconds, or hold “Filter” for 3 seconds. Exact methods by model series are in the reset table above. If none of the listed methods work for your model, search “[your Whirlpool model number] filter reset” at Whirlpool’s support site or check your refrigerator’s user manual. The physical filter is functioning correctly regardless of whether the indicator has been reset.
How do I know if my Whirlpool refrigerator uses Filter 1 or Filter 3? +
Read the label on your currently installed filter. If it shows EDR1RXD1 or W10295370A followed by any suffix — you need Filter 1. If it shows EDR3RXD1 — you need Filter 3. This is the only reliable method because the same Whirlpool model number sometimes shipped with different filter generations at different production dates. Our Filter Compatibility Checker also provides a guaranteed match from your refrigerator model number. Never order based on appearance — Filter 1 and Filter 3 are visually identical but not interchangeable.
Can I use a Maytag or KitchenAid filter in my Whirlpool refrigerator? +
Yes — when both use the same EveryDrop filter number. Maytag and KitchenAid are part of the Whirlpool brand family and the EveryDrop Filter 3 (EDR3RXD1) is physically and mechanically identical whether sold under the Whirlpool, Maytag, or KitchenAid brand name. Any NSF-certified compatible filter listed as compatible with EDR3RXD1 fits all three brands’ refrigerators that use that filter number. Full guide: Whirlpool vs Maytag Filter Compatibility.
My Whirlpool water filter light turned red after only 3 months — is this normal? +
No — the Whirlpool filter indicator counts 180 days from the last reset. If it is turning red before 180 days, either the reset was not completed after the last filter change (the counter continued from a previous partial count), or the control board timer was affected by a power outage or reset event. If you are confident the last filter was replaced recently and the reset was completed, reset the indicator now to restart the 180-day count. The red light at 3 months does not mean the filter is spent — it likely means the timer was not reset correctly at the last replacement. Physical filter capacity is based on time and volume, not the indicator alone.
What is the Whirlpool bypass plug and where should I keep it? +

Most Whirlpool, Maytag, and KitchenAid refrigerators ship from the factory with a filter bypass plug — a solid plastic cap that fits in the filter housing and allows the dispenser and ice maker to operate with unfiltered tap water when no filter is installed. It is typically yellow or white and looks similar to the end cap of a filter.

Do not throw away the bypass plug. Store it in a kitchen drawer or tape it to the back of the refrigerator. You will need it in two specific situations: (1) if a filter develops a leak and you need to keep water flowing while waiting for a replacement, and (2) if you ever need to service or move the refrigerator and need to temporarily remove the filter without losing water access to the ice maker. A household without a bypass plug that develops an urgent filter leak must shut off the supply valve entirely until a replacement arrives — losing both dispenser and ice maker function in the meantime. The bypass plug eliminates this problem for under $5 if you have lost the original. Contact our support team with your Whirlpool model number and we can source the correct bypass plug for your filter housing.

Shop Your Whirlpool EveryDrop Compatible Filter

NSF 42 and 53 certified. Guaranteed to fit. Every EveryDrop filter number in stock. Same-day shipping before 2 PM EST.

🛒 Shop Whirlpool Filters

Similar Posts

Leave a Reply

Your email address will not be published. Required fields are marked *