How to Install an LG Refrigerator Water Filter: Every Model, Every Filter — Complete 2025 Guide

🔧 LG Installation Guide

How to Install an LG Refrigerator Water Filter: Every Model, Every Filter — Complete 2025 Guide

👤 Rachel T. — Filter Specialist 📅 Updated January 2025 ⏱ 10 min read 🔬 LT1000P · LT700P · LT800P
RT
Rachel T.
Head of Filter Compatibility — SwapMyFilter
Rachel has documented the installation process and troubleshot filter problems across every LG refrigerator series produced from 2009 to 2024 — LRMVS, LFXS, LSXS, LFX, LRFXS, LRFOC, and more. This guide covers every LG filter variant with model-specific precision. Nothing is left to the imagination.
10 minTotal time
No toolsRequired
3 modelsLT1000P · LT700P · LT800P

LG refrigerator water filters are among the easiest to install of any major brand — the quarter-turn twist mechanism clicks firmly into place with no ambiguity. The installation takes under 3 minutes once you have the right filter in hand. The problems people run into are almost always from one of three sources: the wrong filter model ordered, the protective cap left on, or the filter not fully rotated to the locked position.

This guide resolves all three before they happen, and covers the specific reset methods for every LG model series currently in production.

💡 Before You Start — Confirm Your Filter Model

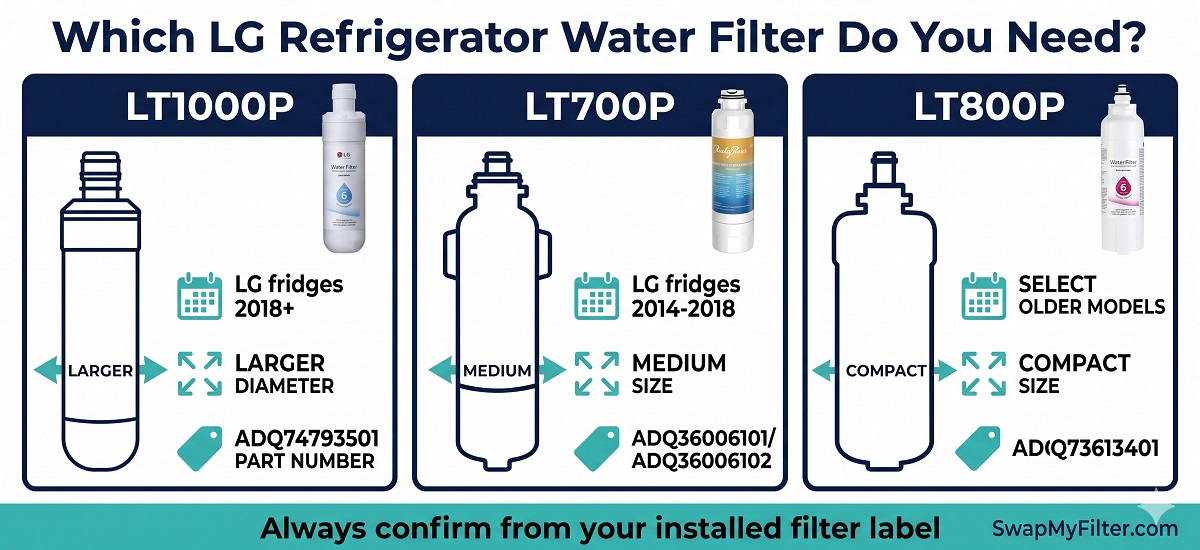
Read the label on your currently installed filter. LG uses three different internal filter models depending on production year. LT1000P (ADQ74793501) — LG refrigerators 2018 and newer. LT700P (ADQ36006101/02) — LG refrigerators 2014–2018. LT800P (ADQ73613401) — select older models. These are physically different filters with different thread patterns — they are NOT interchangeable. Ordering by LG brand alone without checking the filter model number is the most common installation mistake.

LG water filter identification LT1000P vs LT700P vs LT800P

Step-by-Step: How to Install Any LG Refrigerator Water Filter

The installation process is identical for LT1000P, LT700P, and LT800P — the steps below apply to all three. The only difference is filter size and which refrigerators each fits.

1

Locate the Filter Housing

Open the refrigerator (fresh food compartment, not freezer). Look in the upper right interior corner — you will see a cylindrical filter housing with a circular cap. The filter protrudes slightly from the housing on most models. On LG French door models (LRMVS, LFXS, LSXS), the housing is always upper right. On older LG side-by-side models, confirm the filter is in the upper right of the fresh food section.

If you cannot find the filter inside the fridge, your LG may be a model with the filter in the freezer — check behind the ice bucket. This applies to select older LG side-by-side models prior to 2012.
2

Turn Off the Ice Maker

Open the freezer compartment and locate the ice maker assembly. Lift the ice maker arm to the raised (OFF) position. On LG models without an ice maker arm, press the ice maker off button on the control panel. This prevents the ice maker from drawing water while the filter is removed — which can cause a temporary air lock.

3

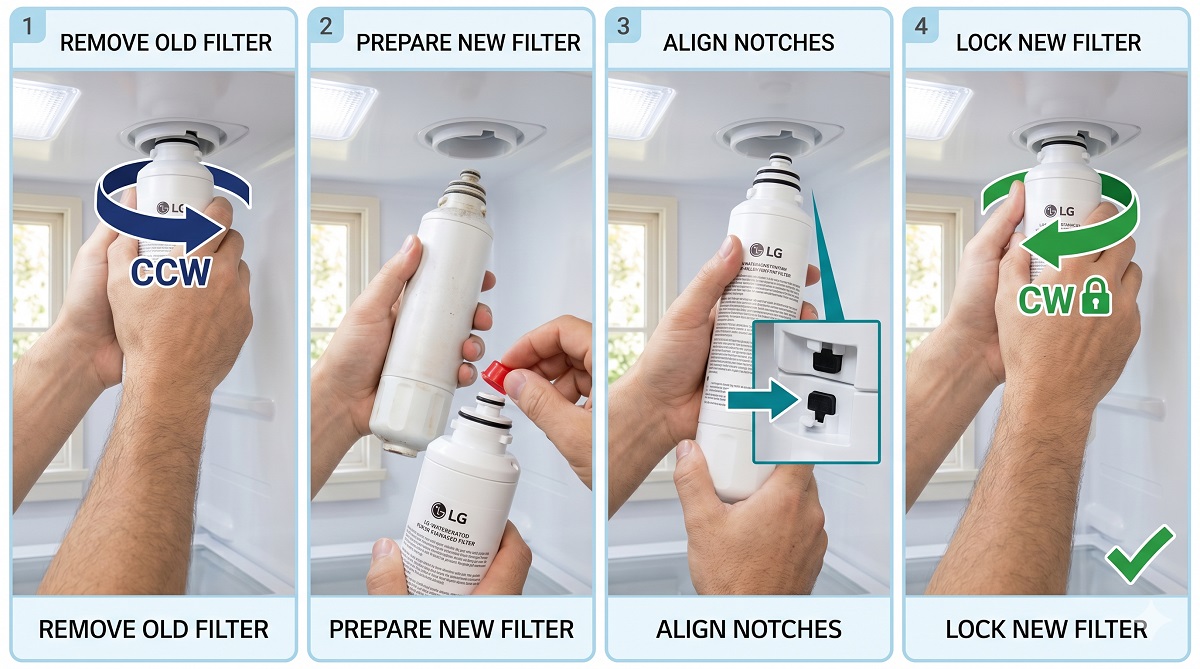
Remove the Old Filter

Grip the body of the installed filter firmly with both hands. Rotate counterclockwise approximately a quarter-turn (about 90 degrees) until you feel it release from the housing lock. The filter will pull straight out from the housing. Have a towel positioned below — a small amount of water (1–3 tablespoons) will drip as the filter releases. This is normal.

LG filters that have been in place for 6+ months are often tighter than expected. Wrapping the filter body with a rubber band gives enough grip to break the seal. Apply steady rotational pressure — never jerk or force. If the filter feels genuinely stuck, try pressing it in slightly before rotating counterclockwise.
4

Remove the Protective Cap From the New Filter

Unbox the new filter. Look at the end that will insert into the housing (the O-ring end). There is a plastic protective cap — blue, red, or clear depending on the filter generation — covering the O-ring. Remove this cap completely before inserting the filter.

This is the most common LG filter installation mistake. The cap is designed to protect the O-ring during shipping and looks like it could be part of the filter body. It is not. Inserting the filter with the cap still on means the O-ring cannot compress against the housing seat — resulting in a leak or no water flow.

After removing the cap, visually inspect the O-ring. It should be a clean, uniformly round rubber ring seated in its groove. If it is cracked, pinched, or out of position, the filter may be defective — contact us before installing.
5

Insert and Lock the New Filter

Align the new filter with the housing opening — there is a notch on the filter that must match a tab in the housing to guide correct alignment. Push the filter straight in until it is fully seated into the housing. Then rotate clockwise approximately a quarter-turn until you feel a firm, definitive mechanical stop. The filter should have zero wobble or play when correctly locked. Some LG models click audibly at the locked position.

The rotation should feel firm and positive — like a quarter-turn that reaches a clear end point. If the rotation feels continuous or the filter wobbles after rotating, it is not fully locked. Remove and reinstall, ensuring the alignment notch is matched before inserting.
6

Flush 2–3 Gallons of Water

Turn the ice maker back on. Then go to the dispenser and run water continuously for 4–6 minutes — dispense into a bucket or large jug. The first 1–2 minutes will produce grey or cloudy water from loose carbon particles — this is completely harmless. Continue until the water runs completely clear. Do not drink this flush water. Full guide: How to Flush a New Refrigerator Water Filter.

Sputter Warning — Do Not Panic: For the first 10–20 seconds of flushing, the dispenser will likely sputter, spit, and shoot air bubbles before water flows steadily. This is a completely normal air purge — the filter housing was empty during the swap and trapped air is now being pushed out by incoming water pressure. Expect 3–6 “spits” of air-mixed water, then a brief hesitation, then smooth continuous flow. If sputtering continues beyond 30 seconds or the dispenser never transitions to smooth flow, the filter may not be fully locked — remove and reinstall firmly before continuing the flush.
Also discard the first full ice maker cycle — ice made from pre-flush water can retain a faint carbon taste. Run one ice cycle and dump the ice before using.
7

Reset the LG Filter Indicator Light

The LG control panel shows a Water Filter indicator that counts down 180 days from the last reset. After replacing the filter, this counter must be manually reset. The reset method varies by LG model series — see the reset table below.

LG refrigerator water filter installation step by step photo guide

LG Filter Reset Methods by Model Series

LG uses different reset sequences across their model families. Find your refrigerator series below:

LG Model Series
Reset Method
LRMVS, LRFXS, LRSXS (2018+ Linear Compressor)
Hold “Water Filter” button on dispenser panel for 3 seconds until indicator turns blue or off
LFXS, LFX, LFCS (2014–2020)
Hold “Water Filter” button for 3 seconds, OR hold “Freezer Temp” + “Refrigerator Temp” simultaneously for 3 seconds
LSXS, LSXC (Side-by-Side 2014+)
Hold “Water Filter” button for 5 seconds until the display changes from red to green
InstaView GSXV, GSJV (2019+)
Tap the InstaView panel → Settings → Water Filter → Reset
Craft Ice LRMCS, LRMVC (2020+)
Hold “Water Filter” or “Filter” button for 3 seconds on the control panel
Older LG (pre-2014)
Hold “Filter” or “Light” button for 3 seconds, or consult your model’s manual
⚠️ If the Reset Method Above Doesn’t Work

LG models manufactured in transitional years sometimes shipped with different control boards in the same model series. If the method above does not reset your indicator, try the other method listed for your series, or search “[your LG model number] filter reset” at LG’s support site lg.com/us/support where LG maintains model-specific documentation. The physical filter replacement is complete regardless of whether the indicator resets — the light is a timer, not a quality sensor.

Post-Installation Troubleshooting — Every Problem Solved

💧 Water leaking from filter housing
Cause: 90% of cases — protective cap still on the O-ring end. Remaining 10% — filter not rotated to full locked position, or incorrect filter model.
Remove filter. Confirm cap is off. Reinstall and rotate clockwise to a definitive mechanical stop with no wobble. If still leaking, confirm the filter model matches your fridge (LT1000P vs LT700P).
🚰 Very slow or no water from dispenser
Cause: Filter not fully locked (water supply valve partially blocked by misaligned filter), new filter needs flushing, or low home water pressure (below 20 PSI).
Confirm filter is fully locked. Run 3 gallons of flush water. Check supply valve behind fridge is fully open. Test home water pressure — LG requires 20–120 PSI for proper dispenser flow.
💨 Water is grey or cloudy after installation
Cause: Normal — loose activated carbon particles from new filter media. Harmless but unpleasant. Resolves with flushing.
Continue flushing. Run 2–3 gallons continuously, discarding all output. Water will clear completely. Do not drink until fully clear. For more detail: How to Flush a New Refrigerator Water Filter.
🔴 Filter indicator light still red after reset attempt
Cause: Incorrect reset sequence used, button not held for full required duration, or control board glitch.
Try the alternative reset sequence for your model series (see table above). Hold the button for the full 3–5 seconds — not a quick press. If still not resetting, unplug the fridge for 30 seconds to reset the control board, then try again. The physical filtration is working regardless of the indicator status.
❄️ Ice maker not working after filter replacement
Cause: Ice maker arm left in OFF position, air lock in water line, or dispenser flush not yet completed.
Confirm ice maker arm is lowered to the ON position. Run the dispenser for 3+ minutes to clear any air from the water line. Wait 24 hours for the ice maker to resume full production — the air must purge completely first.

LG Filter Specifications — Side by Side

SpecificationLT1000P (2018+)LT700P (2014–2018)LT800P (select older)
Part NumberADQ74793501ADQ36006101/ADQ36006102ADQ73613401
Filter Life6 months / 200 gallons6 months / 200 gallons6 months / 200 gallons
NSF 42 and 53YesYesYes
Lead Reduction>99%>99%>99%
OEM Price~$44.99~$42.99~$39.99
Compatible Price$19.95$17.95$18.95
Interchangeable with each other?No — different filter generations, different thread patterns

Full guides for each filter: LG LT1000P Complete Guide · LG LT700P Complete Guide · Best LG Refrigerator Water Filters

💡 LG Warranty and Compatible Filters

Under the US Magnuson-Moss Warranty Act (FTC), LG generally cannot void your refrigerator warranty simply because you used a certified compatible water filter. LG’s own warranty documentation acknowledges this. For LG refrigerators within their first 12 months of warranty, using LG OEM is the most conservative choice. For any LG refrigerator beyond 12 months, a certified compatible is appropriate and substantially cheaper.

Frequently Asked Questions

Where is the water filter on an LG refrigerator? +
On virtually all LG French door, side-by-side, and bottom-freezer refrigerators, the water filter is in the upper right corner of the refrigerator compartment (fresh food section, not freezer). You will see a round housing with the filter cartridge protruding from it. On select older LG side-by-side models prior to 2012, the filter may be located inside the freezer behind the ice bucket. If you cannot find it in the upper right interior, check behind the ice bucket in the freezer.
How do I know if my LG filter is fully locked? +
A correctly locked LG filter has zero wobble or play — grab the filter body firmly and try to wiggle it. If it moves laterally or axially, it is not fully locked. Rotate clockwise until you feel a firm mechanical stop. Some LG models click audibly at the locked position. The filter should also sit flush or slightly proud of the housing without any gap around the rim. If the filter appears to be seated but still wobbles slightly, it is at risk of leaking — complete the clockwise rotation until fully stopped.
How long does it take to install an LG refrigerator water filter? +
Physical installation — removing the old filter and locking in the new one — takes under 3 minutes. Flushing the new filter at the dispenser takes 4–6 additional minutes. The ice maker may take 6–24 hours to resume full ice production after a filter change due to the need to purge air from the water line. Total committed time from start to drinking clean filtered water: approximately 10 minutes plus the passive ice maker recovery period.
Can I use my LG dispenser without a filter installed? +
Yes — most LG refrigerators accept a bypass plug (also called a filter bypass cap) that allows the dispenser and ice maker to operate with unfiltered tap water when no filter is installed. This is useful as a temporary measure when waiting for a new filter to arrive. Bypass plugs for LG refrigerators are available from us — contact our support team with your LG model number for the correct bypass plug. Note that operation without a filter means your dispensed water and ice are unfiltered tap water.

Ready to Order Your LG Filter?

NSF 42 and 53 certified. Guaranteed to fit your LG refrigerator. Same-day shipping before 2 PM EST. Guaranteed Fit Promise on every order.

🛒 Shop LG Compatible Filters

Similar Posts

Leave a Reply

Your email address will not be published. Required fields are marked *